Pages

home about us portfolio tutorials diy home dec faqs contact Image Map
Showing posts with label redo. Show all posts

Tuesday, July 29, 2014

Patience and Persistence Pay Off - The Search for a "New" Sofa

Befores and Afters

I wish I had taken a "before," - no actually an after picture of our old couch.  AFTER years of use and abuse; AFTER dogs; AFTER naps; AFTER food .... you get the idea. It had a LOT of afters. Lucky for me and you I was just ready to get it out of the house. The finish on the "leather" had worn off in places, the cushions were a little flat (and smelly), and the fabric was snagged and worn. It was a sad-looking piece, but it served its purpose.

My Problem!

I know myself. I know how I am. I get a style in my head, it travels to my heart, and nothing else will suffice for the space and feel of the room.  I was in trouble because, I knew what I wanted as a replacement. No more heavy, dark, Tuscany-style furniture. Unlike the old farmhouse, this new house lends itself to a more modern, easy-living vibe.

What I had in mind was something more modern: low back, fabric, clean lines. I wanted nailhead trim, gray. I wanted something like this:


I had been shopping for a replacement in a few furniture stores. While the prices weren't too bad, I wasn't sure we wanted to lay out the money for a new couch. 

The search was on!

I pored over CL, furniture store sales, websites and came up empty. Finally after a month of searching a post came up on my Facebook feed. It was for an older couch, but the color and the shape were right. It was just a little frumpy looking. But for a final cost of $60, the price was right. 

We brought it home. It was in great shape, no tears, worn spots, or snags! There were two things that didn't fit my vision:  the skirt, which made the couch look a little frumpy and the lack of the bling of the nailhead trim. For $60 I felt I could take the leap and do some surgery on our new lackluster friend. (Why would you cover up that beautiful arm?)


The Challenge

When we lifted up the skirts we found beautiful tapered legs. Hmmm...if only the skirt could be shortened to show them off. The nailhead trim seemed to be an easy fix. I purchased some pewter nailheads off of Amazon, found here -   http://amzn.to/1rC0HeY   I probably could have found them cheaper, but I was excited to get started.

After a little trimming around the legs, we were able to staple the skirt up under the edge of the couch. It already looked more modern and streamlined. I trusted the nailhead trim to my daughter who did an amazing job of hammering all those little nails in just the right spots. She outlined the piping on the arms and along the bottom, where the skirt was attached. 


The Result


Here are some inspiration couches that I liked: 

This is what our little find ended up looking like


For less than $100 and with a little patience and persistence, we ended up with a sleek, updated, beauty. If we can do it, so can you!

If you have any questions or comments, please feel free to do so.

To see more updates to our new home follow this link:  http://bit.ly/1o9uQyl


To see more fab ideas for updates, etc, go to  Not Just a Housewife at http://bit.ly/UzVc5E


Friday, October 11, 2013

Lessons Learned - Trends, Likes and Seashells

Every once in a while, do you have a question that seems to have no answers? I'm in one of those places right now, in more than one area of my life. One of those areas has to do with the repainted and updated furniture we do.

Have you ever finished a piece, sat back, admired it and then.....sat back and scratched your head when something so gorgeous just doesn't go out the door? I have had this happen more than I like to admit lately; a Seize the Day Table that we revamped with a chalkboard-looking top and also with a periwinkle butterfly stand.


Why do some pieces fly out the door so quickly, while other sit around like the wallflower at your junior high dance?  Is it color, shape, design? Who knows? Maybe it's all of those - or none. What's not to like? Chalkboard, butterflies, periwinkle blue.  

Maybe it's just a fact of a DIYer's life: there are just some pieces that have a hard time finding a new home! I just don't get it. 

Maybe it's just MY emotional attachment to the colors and pieces. Or the time invested.

Remember opening a new box of 64 crayons? Yep, the big one! That periwinkle blue was one of my favs! That's why it didn't make sense to me that the butterfly stand wasn't selling.

Finally coming to grips with the fact that the pieces weren't going to sell as is, and putting our faves aside, we repainted. UGH!! The Carpe Diem table hasn't gone live yet, but the butterfly stand sold within 24 hours of repainting the periwinkle a soft black.


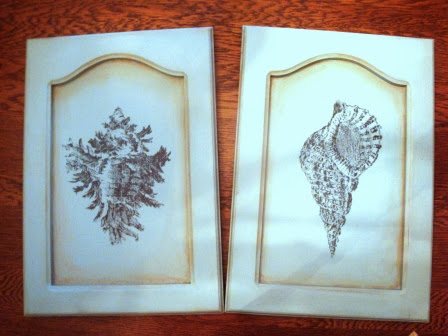
I think the hardest redo of a redo was a pair of cabinet doors that we repurposed for wall art. I thought it was a great idea. I spent hours learning the transfer technique for the shells. I loved the soft arch at the top of the door. That, coupled with one of my favorite colors, sea-glass green, LOVE!

shells, transfer, door art

I still like them, but they just wouldn't move. Well, the other pieces moved after a redo of a redo. Maybe these would, too. (Insert sad face here)

I took the leap. I mixed up some chalkboard paint. Don't hate....I did try some spray paint chalkboard, but it came out shiny and the chalk wouldn't work on it. So I mixed up my own. (Insert happy face here)

We all are aware that chevron is so trending. The charcoal, coral and white desk we revamped soled almost immediately. You can read about it here:  http://bit.ly/1hI8O3H  It was worth trying.

I also found a chevron painter's tape, made by Frogtape. It's not cheap, and it's not easy to find, but it's so easy to use. It comes in three different shapes. I will definitely be using it again!  

(I pulled this image from their website.)

chevron, painter's tape, frog tape

The centers of the doors were repainted with the chalkboard paint. The chevron tape went over the sea-glass green and was painted with a dark teal.  They looked so different!

chevron, chalkboard

And, guess what? They were gone within 5 minutes!! No kidding?!

Sometimes it pays to put your emotions and likes to the side, and take an objective look at things. Hmmmm....that sounds like more than a painting lesson; that's a life lesson!  Lesson learned!


Thursday, October 3, 2013

Mirror, Mirror

With the holidays approaching I'm seeing a lot of white, shimmer and glitter. Here's our contribution. A white, shimmery, lux-looking, but affordable piece. This entire project cost was around $15. I love projects like that!!

if you're like me, sometimes, you just need to do something a little different now and then. If you DIY long enough, eventually, you'll find yourself branching out to try new things. This was one of those projects. Ready for a break from detail painting such as our Count Your Blessings Cabinet - http://bit.ly/GC3TFg

This is one of the projects where the idea was great, but the actual process made us break a sweat. It was a LOT of work. I have to admit that we did do another project very similar to this not too long after. Some of us just don't learn very easily.

That was the case with this vintage round coffee table. We found it in a local antique shop in the clearance section. As you can see, the top was leather, but had seen much better days. It was ripped up and had burn holes through it.

vintage, updated table, painted furniture, mirror, mosaic, updated, upcycled

Friday, September 6, 2013

Gray and Coral Chevron Desk

We're celebrating! Hard work pays off! Our first feature!

This little beauty came to us in not-so-nice condition. Someone had loved it very much. It had stickers on it. The finish was worn. If I remember correctly, there was still a couple of lost crayons in one drawer.


(Wait, let me grab my coffee...okay, ready now.)

I LOVE updating pieces; seeing the color go on and watching your vision for the piece play out is so rewarding, However, I really dispise the prep work for painting a piece.  Removing stickers, sanding, priming, filling in big chips, regluing loose joints, on and on and on. Why can't we just paint??

Often, there's more time and effort in prepping the pieces than in the actual delightful, relaxing painting. I know, right about now, some of you are thinking I"m crazy. You could be right, but I actually dig (like that throw back word?) the painting process.

After prepping this little desk (UGH!), Olivia had a vision for it. (She takes after me...) She painted the base a medium, charcoal gray. The top was given two coats of vivid white.It was coming along beautifully. But there was one thing wrong. Looking a tthe colors and the revamp plan, the Colonial knobs were like a burlap sack with a woman's formal gown: they just didn't match.So, they were primed and painted white to match the top. They looked SO much better!! Now the purse matched the gown!

Sometimes, I prefer handpainting, such as in our Fleur De Lis Table http://bit.ly/15AZtVA but not always.

Sometimes a stencil is what a piece needs. That was the case for this desk. The next step was the most fun. Using a chevron stencil by Cutting Edge Stencils found here on their website http://bit.ly/15EjHUk We have used their stencils for other pieces, that we'll share in the future. Their stencils are ahhh-mazing! They're bendable, strong, and they clean up easeily.  For the desk, we wanted an oversized chevron so we purchased the larger one from Cutting Edge. Using a trendy bright coral, we gave the stenciled area two coats of paint. After removing the stencil, there were a lot of bleeds and uneven edges. It's frustrating when you think a piece is going to be done and BAM! More work; but thankfully, the straight lines in the stencil made it easier. All it took was some painter's tape and a paintbrush to clean them up.

chevron, stencil, coral, gray, update

I'm feeling better now.

In the end, it all came together into one little charming piece. And, all of that hard work: sanding, priming, unsticking, regluing - yeah, all of that paid off! Not only did the desk find a new home, Cutting Edge Stencils gave us props on their blog! Take a look! http://bit.ly/15J2K49 We are so excited, humbled and blown away!

gray, chevron, coral, stencil, desk, back to school, update


I guess Mom, Dad and the teachers were right; hard work DOES pay off. Now, go do some hard work, enjoy the process, and get some kudos!