I hope you all had a wonderful Labor Day!
Mine was definitely a LABOR day. We're taking a small break from the vintage furniture painting that Sow's Ear usually does, and we're making some updates around the house. This weekend was a crazy-busy one. We did manage to squeeze in a family picnic in between all the projects.
Stephanie, over at By Stephanie Lynn @ http://www.bystephanielynn.com/2013/09/sunday-showcase-party-210.html is hosting a linky party, asking her readers to share their recent projects. I'm going to her party!
Ready to take a peek at what we accomplished? It might not seem like a lot, but it was labor and time intensive. I have the blisters to prove it!
I'm very frugal when it comes to anything! Honestly, unless it's something that I fall absolutely in love with, I'm always looking for a way to do it myself...CHEAPER!
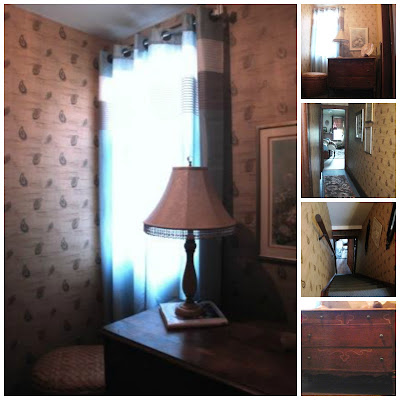
First, there was the stairway/hallway wallpaper project
I don't have any "before" pictures, but believe me the 1980's wallpaper that graced this space was not graceful in any way. It had a cornflower blue, mauve and beige color palette. Not horrible, but the crayon, pencil and tears were not helping matters. I had the strange blue/green Berber carpet that had to stay. At our local Habitat Restore I found a paisley wallpaper with the same strange teal color, along with tan, bronze and gold. The best part ---- ONLY $1 per double roll!! Yep! LOVE it!
Although this seemed like a straight forward project, there were angles, cut ins, railing brackets. It was really time intensive, but I think it turned out very nice.
By the way, see those nice teal knobs on the dresser? They used to be white! I colored the white glass with a teal sharpie, let them dry overnight, baked them in a 350 degree oven for 30 minutes, and VOILA!! New, updated, color-matched knobs!
Second up -- the Dreaded Deck
It was painted 2 years ago and definitely needed a new coat of makeup! I repainted the floor; UGH!! Drudgery! Then came the fun part! Putting the eyeshadow, liner and blush on the foundation.I purchased a 6 by 8 foot outdoor rug at Home Depot for just over $17 http://tinyurl.com/kun6fbf . I made a stencil and with a couple of cans of paprika and white spay paint, created a one-of-a-kind outdoor rug. More updates included the pillow covers for the reading area. Fabric Guru ( http://tinyurl.com/l3nwwre ) has become my online go-to for fabric. Even with the $4.99 shipping cost, I can find current patterns at affordable prices. The antique headboard potting bench was a project that my brother completed for me as a Christmas present. He's a good guy! Another project FINI!
Third up...bedroom curtain tie backs and DIY easy Roman shades
Kind of following the directions from 365 Days to Simplicity (http://tinyurl.com/mbbuh2r ) and some $1/yard fabric that I picked up at Wally World, I made three Roman shades that replaced the worn out, gross mini blinds in my bedroom. The directions for the custom tie backs are found here: http://sowsear2.blogspot.com/2013/09/one-of-kind-curtain-tie-backs.html What d'ya think?
And, Fourth, but not last (sigh) Upcycled Burlap Covered Boxes
Using office paper boxes I recreated the burlap storage boxes found at One Kings Lane for a fraction of the price. The original price for this set of three boxes was $69; and the largest box was 8"H x 15.75"W x 12"L http://tinyurl.com/kr7dzx3 With my trustly glue gun, scissors, and some paitence, I was able to reproduce a much larger box for $.25 a piece. The boxes were free and I found the burlap coffee bags at a local greenhouse supply warehouse for 25 cents a piece!! You can't get much more frugal than that!
Well, I think that's enough for one weekend, don't you? Phew! I'm going to go take a nap!


No comments :
Post a Comment
Thanks so much for taking the time to read our blog. Your comments and questions are ALWAYS welcome.